Introduction
I won’t get into the details of why Threat Detection teams should consider implementing Detection-as-Code. Anton Chuvaki and Kyle Bailey have both written excellent Medium articles that detail its benefits and how it can improve a Threat Detection operation by enabling better collaboration, testing, deployment and lifecycle management of detection content.
Instead, this article will walk you through an example of how an organization can deploy a Detection-as-Code pipeline using Sigma rules, GitLab CI/CD, and Splunk. This is not a step-by-step guide; if you plan to follow along and build a Detection-as-Code pipeline based on what I demonstrate here, you’ll need to have a foundational understanding of Docker, GitLab, Git, Python, Sigma Rules and YAML.
Let’s get started!
Sigma & Sigmac
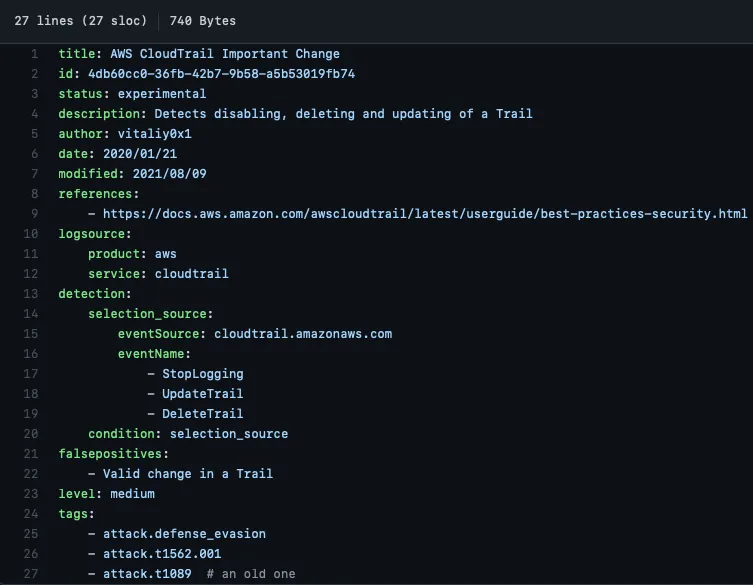
Sigma is an open source project that defines a standard and vendor-agnostic format for developing detection content. The rules are written in structured YAML format, making it easy for both human and system consumption. For my Detection-as-Code pipeline, I chose to use the Sigma for creating detection content for a few reasons:
- Scalability: one Sigma rule can be deployed to many discrete SIEMs, EDRs, NDRs, XDRs, and whatever “DRs” that have yet to be invented.
- Sharing: Sigma rules can easily be shared with or received from other organizations.
- Simplicity: Threat Detection analysts will only need to master one standard for creating detection content.
The Sigma project includes sigmac, a powerful Python command line tool that can convert Sigma rules for use by controls like Splunk, Devo, ELK, and CrowdStrike using “backends”. Custom backends can be created for virtually any detective control that accepts detection logic.
In my pipeline, I’ll use sigmac to convert Sigma rules to their Splunk-friendly SPL counterpart.
Pipeline Infrastructure
To build the pipeline, I’ll provision the following three Docker containers and a docker network named “dacnet” to provide version control, CI/CD, SIEM infrastructure, and connectivity between them:
- gitlab: A GitLab Community Edition container. I’ll use this as the VCS for detection content and for supervising the CI/CD pipeline.
- gitlab-runner: A GitLab runner container for running CI/CD pipelines. This will be used to build and deploy detection content using additional docker containers.
- splunk: A Splunk search head and indexer with Splunk BOTSv3 dataset installed at runtime. This will be used as the SIEM. I’ll use the BOTSv3 data set to demo the creation of Sigma rules and data source configuration.
I crafted the following docker-compose.yml file to help me build the infrastructure on the fly using Docker Compose:
version: '3'

networks:
  dacnet:
    external: true
    name: dacnet

services:
    gitlab:
        networks:
            dacnet:
                aliases:
                    - gitlab
        ports:
            - '443:443'
            - '80:80'
            - '222:22'
        hostname: gitlab
        environment:
            GITLAB_OMNIBUS_CONFIG: |
                external_url 'http://gitlab'
                gitlab_rails['initial_root_password']='$DEFAULT_PASSWORD'
        container_name: gitlab-dac
        image: 'gitlab/gitlab-ce:latest'
    gitlab-runner:
        networks:
            dacnet:
                aliases:
                        - gitlab-runner
        ports:
            - '81:80'
        hostname: gitlab-runner
        container_name: gitlab-runner-dac
        restart: always
        volumes:
            - '/srv/gitlab-runner/config:/etc/gitlab-runner'
            - '/var/run/docker.sock:/var/run/docker.sock'
        image: 'gitlab/gitlab-runner:latest'
    splunk:
        networks:
            dacnet:
                aliases:
                    - splunk
        ports:
            - '8000:8000'
            - '8089:8089'
        hostname: splunk
        container_name: splunk-dac
        environment:
            - SPLUNK_START_ARGS=--accept-license
            - SPLUNK_PASSWORD=$DEFAULT_PASSWORD
            - SPLUNK_APPS_URL=https://botsdataset.s3.amazonaws.com/botsv3/botsv3_data_set.tgz
        container_name: splunk-dac
        image: 'splunk/splunk:latest'
Using the docker-compose.yml file, I’ll deploy the containers docker-compose up -d. The GitLab and Splunk servers are ready to go. Some extra configuration is required to connect the GitLab runner with the GitLab CE server.

GitLab Runner
The GitLab runner needs to be registered in GitLab CE before it’s available for use in the CI/CD pipeline. In GitLab UI, I navigated to Menu → Admin → Overview → Runners and copied the Registration Token to clipboard.
I dropped into the gitlab-runner-dac container’s bash prompt docker exec -it gitlab-runner bash and ran the following command to register the runner, using the CI/CD runner Registration Token provided by my GitLab CE server:
gitlab-runner register \
--executor="docker" \
--url="http://gitlab" \
--clone-url="http://gitlab" \
--registration-token="GITLAB_TOKEN_HERE" \
--description="docker-runner" \
--tag-list="docker" \
--docker-network-mode="dacnet"
The runner is now connected to the GitLab CE server and ready for use in the pipeline. As you can see, I set the runner’s tag to “docker”, all pipeline jobs expecting this runner to carry out their instructions must define the “docker” tag.

GitLab CI
Detection as Code Project
In GitLab, I created project named “Detection as Code” to serve as a foundation for the CI/CD pipeline and VCS for detection content. Here’s a quick breakdown of the structure of the project:
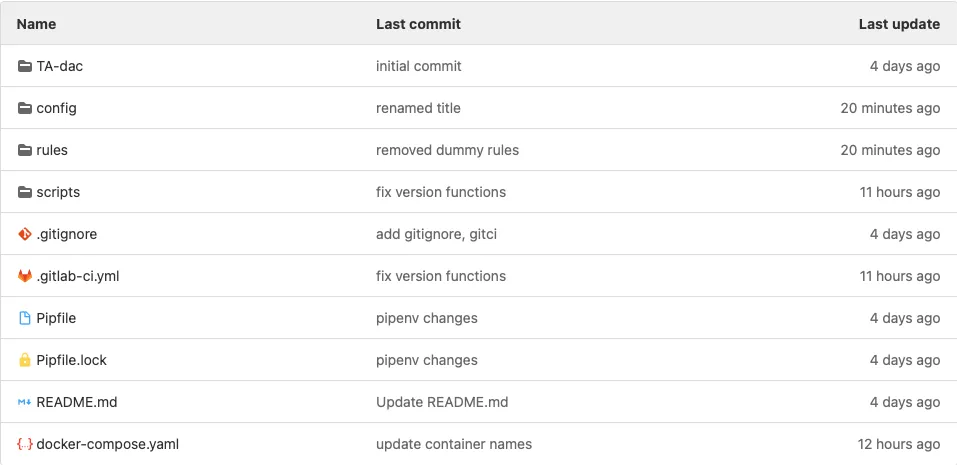
- /config: contains Sigma data source configuration and mapping files. These files establish the relationship between Sigma data sources and the detection control data sources. In this example, I created a mapping configuration named “splunk-dac.yml” that maps the BOTSv3 PowerShell logs Splunk index, sourcetype, and field mappings to the appropriate Sigma datasources.
- /rules: contains Sigma rules stored in their native .yml format. This is where Threat Detection teams can create, update, and depreciate detection content.
- /scripts: contains three scripts used in the CI/CD pipeline for building and deploying detection content. I’ll dig into these scripts in the next section.
- .gitlab-ci.yml: the GitLab CI/CD configuration file that instructs the GitLab runner on how to build and deploy detection content. I’ll also dive into this file more in the next section.
- Everything else: the Pipenv/Pipenv.lock files are used by Pipenv in a CI/CD job to install required Python packages and their dependencies. The docker-compose.yml file contains the same code I shared in the Pipeline Architecture section above. The README.md file contains the title and a basic explaination of the GitLab project and .gitignore tells Git which files/folders to ignore during local development.
I’ve made this project available in GitHub here: https://github.com/infosecB/detection-as-code
GitLab CI and Scripts
GitLab CI provides an environment to build, test, and deploy software of any kind. To create a CI/CD pipepline in GitLab, a .gitlab-ci.yml configuration file must be created within the project. Here’s the configuration I created which I’ve explained in the inline comments:
### Define two seperate jobs for CI/CD pipeline.
stages:
  ### The build job runs anytime a user commits code
  - build
  ### The release job only runs when the main branch is tagged with a version
  - release

build:
  ### Sigmac requires Python 3.8, specify the appropriate Docker image
  image: python:3.8
  ### Identify build stage
  stage: build
  ### Install Pipenv, Python dependencies and the Splunk Packaging toolkit.
  before_script:
    - pip install pipenv
    - pipenv install
    - wget https://download.splunk.com/misc/packaging-toolkit/splunk-packaging-toolkit-1.0.1.tar.gz
    - pipenv install splunk-packaging-toolkit-1.0.1.tar.gz
  script:
    ### Run Sigmac against all rules in the /rules folder that have been set to status=stable.
    ### Outputs to the out.yaml file with the resulting search logic and a few Sigma fields.
    - pipenv run sigmac --filter 'status=stable' --target splunk --config config/splunk-dac.yml  --output-format yaml --output out.yaml --output-fields title,id,status,author,tags --recurse rules/
    ### Run script that converts the Sigmac produced .yml to Splunk saved search stanzas in savedsearch.conf.
    - pipenv run python scripts/convert_yml_to_search.py
    ### Copies the savedsearch.conf to the appropriate Splunk TA folder
    - cp savedsearches.conf TA-dac/default
    ### Sets the TA version based on either tag version number or "0.0.1" if run by an untagged Git commit.
    - pipenv run python scripts/set_version.py --file "TA-dac/default/app.conf" --version "${CI_COMMIT_TAG}"
    ### Runs the splunk-sdk slim utility to package the Splunk TA.
    - pipenv run slim package TA-dac
  artifacts:
    ### Specify the output files as artifacts that can be retrieved in release job
    ### or downloaded via the Gitlab UI
    paths:
      - out.yaml
      - savedsearches.conf
      - 'TA-dac-*.tar.gz'
  tags:
    ### Tag job as "docker" to call the Docker Gitlab runner
    - docker

release:
  ### Run on latest python Docker image
  image: python:latest
  ### Identify as release stage
  stage: release
  before_script:
    ### Install the Python splunk-sdk library for use by deploy_splunk_package.py script
    - pip install splunk-sdk
  script:
    ### Upload the TA to Gitlab packages
    - 'curl --header "JOB-TOKEN: $CI_JOB_TOKEN" --upload-file TA-dac-${CI_COMMIT_TAG}.tar.gz "${CI_API_V4_URL}/projects/${CI_PROJECT_ID}/packages/generic/TA-dac/${CI_COMMIT_TAG}/TA-dac-${CI_COMMIT_TAG}.tar.gz"'
    ### Run the deploy_splunk_package.py to install the new TA-dac TA
    - python scripts/deploy_splunk_package.py --url "${CI_API_V4_URL}/projects/${CI_PROJECT_ID}/packages/generic/TA-dac/${CI_COMMIT_TAG}/TA-dac-${CI_COMMIT_TAG}.tar.gz" --user "$ENV_USERNAME" --password "$ENV_PASSWORD" --host "$ENV_HOST" --port $ENV_PORT
  rules:
    ### Restrict this job to only run when the main branch is tagged
    - if: '$CI_COMMIT_BRANCH == "main" && $CI_COMMIT_TAG'
  tags:
    ### Tag job as "docker" to call the Docker Gitlab runner
    - docker
Build Scripts
Sigmac converts the Sigma rule logic to a Splunk SPL query and outputs an out.yaml file which contains the resulting query along with several other fields we’ll use in our Splunk TA.
convert_yml_to_search.py then converts the Sigmac out.yaml file to Splunk saved search stanzas and outputs a savedsearches.conf file. In this example, the saved searches are configured to produce a Splunk built-in “alert,” which is very limited in capability. This saved search configuration could easily be tweaked to create Splunk ES notable events or to create events in downstream systems like a SOAR via API calls.
import yaml
import os
import glob
from jinja2 import Template


ss_template = """
[{{ title }}]
alert.expires = 5m
alert.suppress = 1
alert.suppress.period = 60m
alert.track = 1
counttype = number of events
cron_schedule = {{ cron }}
description = Detects a second malicious IP.
enableSched = 1
quantity = 0
relation = greater than
search = {{ search }}

"""


def priority_to_cron(priority):
    if priority == "low":
        return "0 */4 * * *"
    elif priority == "high":
        return "*/15 * * * *"
    elif priority == "critical":
        return "*/5 * * * *"
    else:
        return "0 * * * *"


t = Template(ss_template)

savedsearch_content = ""

rules = yaml.safe_load(open("out.yaml"))
for rule in rules:
    if rule["status"] == "stable":
        print("Creating alert for " + rule["title"])
        savedsearch_content += t.render(
            title=rule["title"], search=rule["rule"][0], cron=priority_to_cron("normal")
        )
    else:
        print(
            'The rule "'
            + rule["title"]
            + '" status is set to '
            + rule["status"]
            + ", skipping."
        )

f = open("savedsearches.conf", "w")
f.write(savedsearch_content)
f.close()
set_version.py is used to update the version number contained in the app.conf Splunk TA file.
import argparse
import re


def set_version(conf_file, version):
    if version == "":
        version = "0.0.1"
    elif re.match(".*(\d)+\.(\d)+\.(\d)+.*", version):
        version = (re.search("(\d)+\.(\d)+\.(\d)+", version)).group()
    else:
        print("An invalid version number was tagged " + version)
        exit(1)
    print("Updating app.conf file with version number: " + version)
    with open(conf_file, "r") as file:
        lines = file.readlines()
    with open(conf_file, "w") as file:
        for line in lines:
            file.write(re.sub(r"VERSION", version, line))
    with open(".env", "w") as env_file:
        env_file.write(f'export VERSION="{version}"')
    file.close()


def main():
    parser = argparse.ArgumentParser()
    parser.add_argument("--file", type=str)
    parser.add_argument("--version", type=str)
    args = parser.parse_args()
    set_version(args.file, args.version)


if __name__ == "__main__":
    main()
The splunk-sdk slim package command is used to build and generate the TA .pkg file.
Release Job Scripts
Finally, the deploy_splunk_package.py script interfaces with the Splunk REST API to upload and install the latest version of the TA during the deployment phase of the pipeline.
from logging import error
import splunklib.client as client
import os
import argparse


def upload_ta(url, user, password, host, port):
    service = client.connect(
        host=host, port=port, username=user, password=password, verify=False
    )
    service.post(path_segment="apps/local", filename=True, name=url, update=True)
    service.logout()


def main():
    parser = argparse.ArgumentParser()
    parser.add_argument("--url", type=str)
    parser.add_argument("--user", type=str)
    parser.add_argument("--password", type=str)
    parser.add_argument("--host", type=str)
    parser.add_argument("--port", type=str)
    args = parser.parse_args()
    upload_ta(args.url, args.user, args.password, args.host, args.port)


if __name__ == "__main__":
    main()
Detection Content Creation Workflow
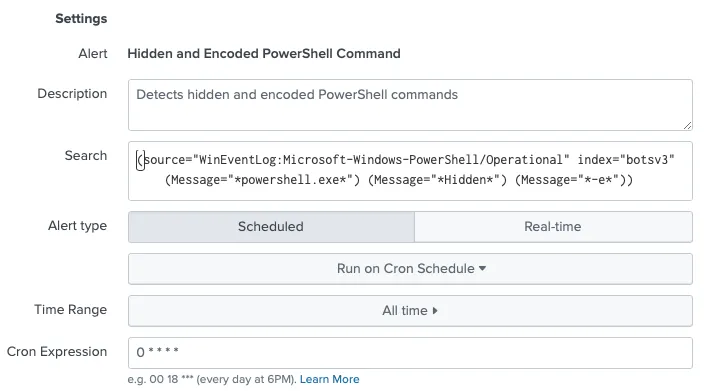
Threat Detection team staff can now follow a simple procedure to create, review, and deploy new content. In this example, I’ll run through the same use case I used in my Serverless Detection Pipeline: detecting use of PowerShell encoded & hidden command.
- Create a GitLab issue in the “Detection as Code” project for the use case and an associated merge request.
- Create the Sigma rule .yml on the new branch and mark the merge request as “ready” when done. Each time a commit is pushed to the project, regardless of branch, the “build” job is run. If any issues exist in the detection content, the job will fail and output errors.
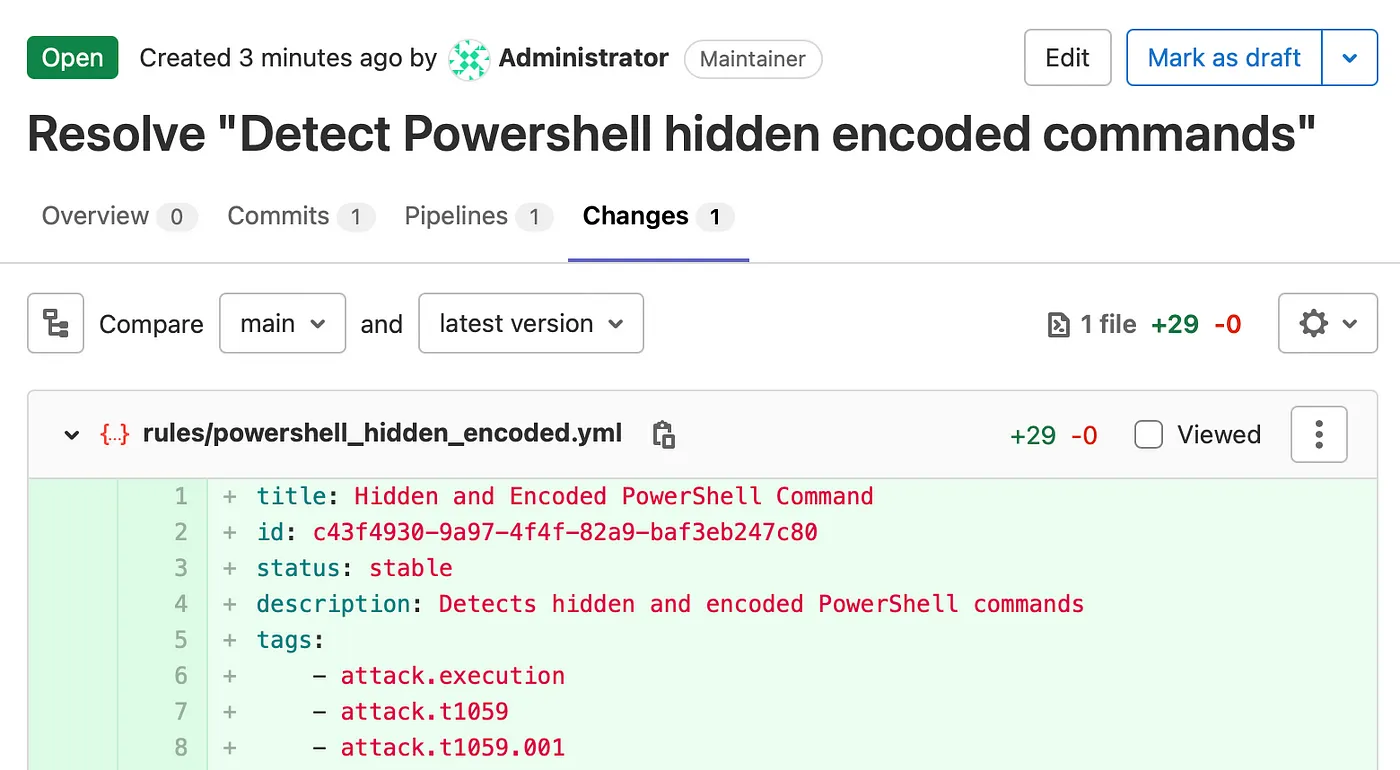
Here’s the full example Sigma rule:
title: Hidden and Encoded PowerShell Command
id: c43f4930-9a97-4f4f-82a9-baf3eb247c80
status: stable
description: Detects hidden and encoded PowerShell commands
tags:
    - attack.execution
    - attack.t1059
    - attack.t1059.001
author: infosecB
date: 2021/11/17
modified: 2021/11/17
logsource:
    product: windows
    service: powershell
detection:
    powershell_exe:
        Message:
            - '*powershell.exe*'
    hidden:
        Message:
            - '*Hidden*'
    encoded:
        Message:
            - '*-e*'
    condition: powershell_exe and hidden and encoded
falsepositives:
    - Some configuration management systems may trigger this alert
level: High- Team members peer review the detection content, then make comments and edits as needed.
- Once reviewed and approved, the branch is merged into the main branch.
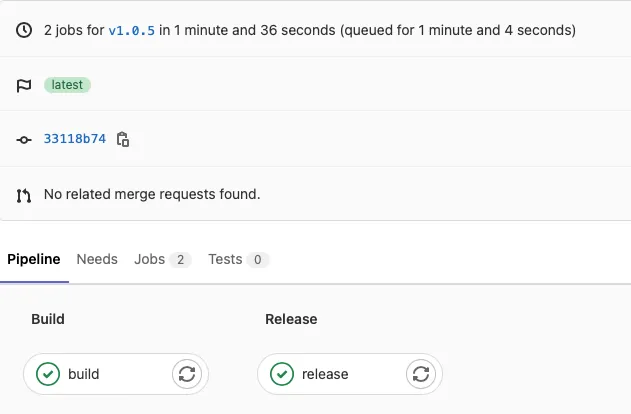
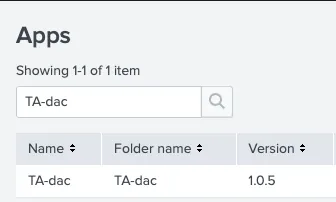
- Periodically, like at the end of a sprint cycle, the main branch is tagged with new version (e.g. v1.0.5). The “build” and “release” CI/CD jobs are automatically run and the TA-dac Splunk TA is built and deployed to Splunk.
Conclusion & Next Steps
While this example pipeline demonstrates the basic capabilities of building and releasing detection content, it leaves much to be desired. GitLab CI/CD presents many more capabilities to run an effective Detection-as-Code pipeline. Some additional pipeline jobs could be created for testing, documentation, and continuous review of detection content:
- Automated Sigma and Splunk TA tests: to ensure high quality content and smooth-running CI/CD pipeline, tests should be created to check the validity of the Sigma rules and the Splunk TA.
- Automated documentation: important components of the detection content’s documentation can be included in each Sigma rule. This creates an opportunity to automatically produce documentation in the CI/CD pipeline by scripting the creation of .md or .rst files.
- Continuous review of detection content: A CI/CD pipeline could be created to mark out of date detection content for review by creating new Gitlab issues.